Using Push Notifications with Firebase in an Ionic + Angular App
Web Framework: Angular Platforms: iOS, Android
One of the most common features provided by application developers to their users is push notifications. In this tutorial, we'll walk through all the steps needed to get Firebase Cloud Messaging working on iOS and Android.
For the purposes of registering and monitoring for push notifications from Firebase, we'll make use of the Push Notification API for Capacitor in an Ionic + Angular application.
Required Dependencies
Building and deploying iOS and Android applications using Capacitor requires a bit of setup. Please follow the instructions to install the necessary Capacitor dependencies here before continuing.
To test push notifications on iOS, Apple requires that you have a paid Apple Developer account and a physical iOS device.
If you are running into issues or your console throws warnings about outdated or deprecated packages, make sure that you're on the latest stable versions of Node, Android Studio, and Xcode.
Also, we're using Firebase for push notifications, so if you're using other Cordova plugins that use the Firebase SDK make sure they're using the latest versions.
Prepare an Ionic Capacitor App
If you have an existing Ionic app, skip this section. If not, let's create an Ionic app first.
In your preferred terminal, install the latest version of the Ionic CLI:
npm install -g @ionic/cli
Next, let's use the CLI to create a new Ionic Angular app based on the blank starter project and call it capApp:
ionic start capApp blank --type=angular
On the prompt asking to integrate your new app with Capacitor, type y and press enter. That will add Capacitor and the Capacitor CLI to our new application.
Once the application has been created successfully, switch to the newly created project directory:
cd capApp/
Finish up by running npx cap init, which will allow us to fill out our app information.
npx cap init
? App name: CapApp
? App Package ID: com.mydomain.myappname
Building the App & Adding Platforms
Before adding any native platforms to this project, the app must be built at least once. A web build creates the web assets directory that Capacitor needs (www folder in Ionic Angular projects).
ionic build
Next, let's add the iOS and Android platforms to our app.
npx cap add ios
npx cap add android
Upon running these commands, both android and ios folders at the root of the project are created. These are entirely separate native project artifacts that should be considered part of your Ionic app (i.e., check them into source control).
Using the Capacitor Push Notification API
First of all, we need to install the Capacitor Push Notifications Plugin
npm install @capacitor/push-notifications
npx cap sync
Then, before we get to Firebase, we'll need to ensure that our application can register for push notifications by making use of the Capacitor Push Notification API. We'll also add an alert (you could use console.log statements instead) to show us the payload for a notification when it arrives and the app is open on our device.
In your app, head to the home.page.ts file and add an import statement and a const to make use of the Capacitor Push API:
import {
  ActionPerformed,
  PushNotificationSchema,
  PushNotifications,
  Token,
} from '@capacitor/push-notifications';
Then, add the ngOnInit() method with some API methods to register and monitor for push notifications. We will also add an alert() a few of the events to monitor what is happening:
export class HomePage implements OnInit {

ngOnInit() {
    console.log('Initializing HomePage');

    // Request permission to use push notifications
    // iOS will prompt user and return if they granted permission or not
    // Android will just grant without prompting
    PushNotifications.requestPermissions().then(result => {
      if (result.receive === 'granted') {
        // Register with Apple / Google to receive push via APNS/FCM
        PushNotifications.register();
      } else {
        // Show some error
      }
    });

    // On success, we should be able to receive notifications
    PushNotifications.addListener('registration',
      (token: Token) => {
        alert('Push registration success, token: ' + token.value);
      }
    );

    // Some issue with our setup and push will not work
    PushNotifications.addListener('registrationError',
      (error: any) => {
        alert('Error on registration: ' + JSON.stringify(error));
      }
    );

    // Show us the notification payload if the app is open on our device
    PushNotifications.addListener('pushNotificationReceived',
      (notification: PushNotificationSchema) => {
        alert('Push received: ' + JSON.stringify(notification));
      }
    );

    // Method called when tapping on a notification
    PushNotifications.addListener('pushNotificationActionPerformed',
      (notification: ActionPerformed) => {
        alert('Push action performed: ' + JSON.stringify(notification));
      }
    );
}
Here is the full implementation of home.page.ts:
import { Component, OnInit } from '@angular/core';

import {
  ActionPerformed,
  PushNotificationSchema,
  PushNotifications,
  Token,
} from '@capacitor/push-notifications';

@Component({
  selector: 'app-home',
  templateUrl: 'home.page.html',
  styleUrls: ['home.page.scss'],
})
export class HomePage implements OnInit {
  ngOnInit() {
    console.log('Initializing HomePage');

    // Request permission to use push notifications
    // iOS will prompt user and return if they granted permission or not
    // Android will just grant without prompting
    PushNotifications.requestPermissions().then(result => {
      if (result.receive === 'granted') {
        // Register with Apple / Google to receive push via APNS/FCM
        PushNotifications.register();
      } else {
        // Show some error
      }
    });

    PushNotifications.addListener('registration', (token: Token) => {
      alert('Push registration success, token: ' + token.value);
    });

    PushNotifications.addListener('registrationError', (error: any) => {
      alert('Error on registration: ' + JSON.stringify(error));
    });

    PushNotifications.addListener(
      'pushNotificationReceived',
      (notification: PushNotificationSchema) => {
        alert('Push received: ' + JSON.stringify(notification));
      },
    );

    PushNotifications.addListener(
      'pushNotificationActionPerformed',
      (notification: ActionPerformed) => {
        alert('Push action performed: ' + JSON.stringify(notification));
      },
    );
  }
}
After this, you'll want to generate a new build and let Capacitor know about the changes. You can do that with:
ionic build
npx cap copy
Creating a Project for your App on Firebase
Before we can connect Firebase Cloud Messaging to your application and send push notifications, you'll need to start a project in Firebase.
Go to the Firebase Console and click the Add project button.
Name the project, accept the Firebase ToS and click Create project to continue. A Project ID should be automatically generated for you.
Android
Integrating Firebase with the Android app
This section more-or-less mirrors the setting up Firebase using the Firebase console documentation. See below for specific Capacitor-related notes.
Go to the Project Overview page for your Firebase project and at the top, click on the Android icon to add a new android application.

The next screen will ask you for some information about your application.
- Your Android package name should match the appId from your
capacitor.config.jsonfile - We used
com.mydomain.myappnamefor this Capacitor app ID, so that is what we'll use for this entry. - Nickname and Debug Signing Certificate are optional
Then click the Register app button.
Download and Use the google-services.json file
The next prompt will ask you to download a google-services.json file. This file contains the information your Capacitor app needs to connect to Firebase from Android.
Download the google-services.json file to your local machine. Then move the file into your Capacitor Android project directory, specifically under android/app/.

We don't need to add any dependencies to our project because Capacitor projects automatically include a version of firebase-messaging in it's build.gradle file.
iOS
Prerequisites
iOS push notifications are significantly more complicated to set up than Android. You must have a paid Apple Developer account and take care of the following items prior to being able to test push notifications with your iOS application:
- Setup the proper Development or Production certificates & provisioning profiles for your iOS application in the Apple Developer Portal
- Create an APNS certificate or key for either Development or Production in the Apple Developer Portal
- Ensure Push Notification capabilities have been enabled in your application in Xcode
- Have a physical iOS device as per the guidelines in the Environment Setup documentation
Integrating Firebase with our native iOS app
This part is very similar to the Android section above, with a few key differences.
First, go to the Project Overview page for your Firebase project. If you've been following this guide, you'll already have an Android application listed at the top of the page.
To add iOS to your Firebase project, click the Add App button and select the iOS platform.
The next screen will ask you for some information about your application.
- Your iOS bundle ID should match the appId from your
capacitor.config.jsonfile - We used
com.mydomain.myappnamefor this Capacitor app ID, so that is what we'll use for this entry. - App Nickname and App Store ID are optional
Then click the Register app button.
Add the GoogleService-Info.plist file to your iOS app
Note: This is not the same file used for your Android app.
Download the GoogleService-Info.plist provided to your local machine.
You'll then want to open Xcode...
npx cap open ios
... and move the .plist file into your Xcode project as instructed by Firebase, ensuring to add it to all targets.

Add the Firebase SDK via CocoaPods
The Push Notification API on iOS makes use of CocoaPods - an iOS dependency management system - and we need to tell CocoaPods to make use of Firebase.
To do this, we need to modify the Podfile, which can be found in Xcode under Pods:

We need to add Firebase to the CocoaPods provided for our App target. To do that, add pod Firebase/Messaging to your target 'App' section, like so:
target 'App' do
  capacitor_pods
  # Add your Pods here
  pod 'Firebase/Messaging' # Add this line
end
Your Podfile should look something like this:
require_relative '../../node_modules/@capacitor/ios/scripts/pods_helpers'

platform :ios, '13.0'
use_frameworks!

# workaround to avoid Xcode caching of Pods that requires
# Product -> Clean Build Folder after new Cordova plugins installed
# Requires CocoaPods 1.6 or newer
install! 'cocoapods', :disable_input_output_paths => true

def capacitor_pods
  pod 'Capacitor', :path => '../../node_modules/@capacitor/ios'
  pod 'CapacitorCordova', :path => '../../node_modules/@capacitor/ios'
end

target 'App' do
  capacitor_pods
  # Add your Pods here
  pod 'Firebase/Messaging'
end

post_install do |installer|
  assertDeploymentTarget(installer)
end
Update the Project
Now we'll need to ensure that our iOS project is updated with the proper Firebase CocoaPod installed.
Note: This part can take a while as CocoaPods needs to download all the appropriate files/dependencies.
npx cap update ios
Add Initialization Code
To connect to Firebase when your iOS app starts up, you need to add the following to your AppDelegate.swift file.
First, add an import at the top of the file:
import Firebase
... and then add the configuration method for Firebase to initialization code to your AppDelegate.swift file, in the application(didFinishLaunchingWithOptions) method.
FirebaseApp.configure()
Then you need to add the following two methods to correctly handle the push registration events:
func application(_ application: UIApplication, didRegisterForRemoteNotificationsWithDeviceToken deviceToken: Data) {
  Messaging.messaging().apnsToken = deviceToken
  Messaging.messaging().token(completion: { (token, error) in
    if let error = error {
        NotificationCenter.default.post(name: .capacitorDidFailToRegisterForRemoteNotifications, object: error)
    } else if let token = token {
        NotificationCenter.default.post(name: .capacitorDidRegisterForRemoteNotifications, object: token)
    }
  })
}

func application(_ application: UIApplication, didFailToRegisterForRemoteNotificationsWithError error: Error) {
  NotificationCenter.default.post(name: .capacitorDidFailToRegisterForRemoteNotifications, object: error)
}
Your completed AppDelegate.swift file should look something like this:
import UIKit
import Capacitor
import Firebase

@UIApplicationMain
class AppDelegate: UIResponder, UIApplicationDelegate {

  var window: UIWindow?


  func application(_ application: UIApplication, didFinishLaunchingWithOptions launchOptions: [UIApplication.LaunchOptionsKey: Any]?) -> Bool {
    // Override point for customization after application launch.
    FirebaseApp.configure()
    return true
  }

  func application(_ application: UIApplication, didRegisterForRemoteNotificationsWithDeviceToken deviceToken: Data) {
    Messaging.messaging().apnsToken = deviceToken
    Messaging.messaging().token(completion: { (token, error) in
      if let error = error {
          NotificationCenter.default.post(name: .capacitorDidFailToRegisterForRemoteNotifications, object: error)
      } else if let token = token {
          NotificationCenter.default.post(name: .capacitorDidRegisterForRemoteNotifications, object: token)
      }
    })
  }

  func application(_ application: UIApplication, didFailToRegisterForRemoteNotificationsWithError error: Error) {
    NotificationCenter.default.post(name: .capacitorDidFailToRegisterForRemoteNotifications, object: error)
  }
Upload the APNS Certificate or Key to Firebase
If you followed the instructions from the beginning, you'll have created an Apple APNS Certificate or an APNS Auth Key in the Apple Developer portal. You need to upload one of these to Firebase before Firebase can talk to APNS and send push notifications to your application.
To upload your certificate or auth key, from the Project Overview page:
- Click on your iOS application and then the Settings gear icon.
- On the Settings page, click on the Cloud Messaging tab.
- Under the iOS app configuration header, upload your Auth Key or Certificate(s) using the provided Upload button.
Sending a Test Notification
Now for the fun part - let's verify that push notifications from Firebase are working on Android and iOS!
We need to fire up our application on Android or iOS so that our home.page.ts page can register and receive notifications.
To open your Android project in Android Studio:
npx cap open android
To open your iOS project in Xcode:
npx cap open ios
Once the project is open, side-load the application on your device using the Run feature of either Android Studio or Xcode. The app should start up on the home page.
Note: On iOS, you will see a popup asking you to allow notifications for your app - make sure you choose to Allow notifications!
If your app successfully registers and you followed the code above, you should see an alert with a success message!
Now we'll test to see if the notifications are received by our device. To send a notification, in Firebase, go to the Cloud Messaging section under the Grow header in the project pane.
Next, select the New Notification button.
When creating the notification, you only need to specify the following information:
- The text of the notification
- The title (Android only, optional for iOS)
- The Target (either a user segment or topic; I recommend just targeting the iOS or Android app itself, see below)

- The Scheduling (leave this to "Now")
At that point, you can Review the notification you've put together and select Publish to send the notification out.
If you've setup your application correctly, you'll see an alert pop up on your home screen with the push notification you composed in Firebase. You can then tap on the notification and you should get an alert for the pushActionPerformed event, per our code above.


Images in Push Notifications
You can optionally include Images as part of push notification by following the guide below.
The Firebase Messaging SDK can include an ImageUrl property as part of its payload and will display it. The url must be https:// and be sized under 300kb.
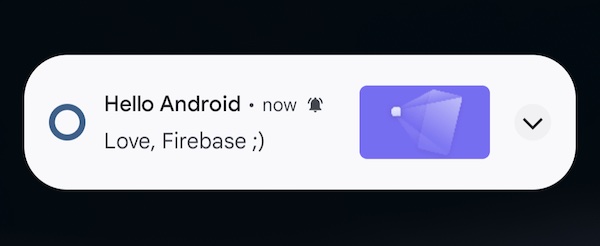
Images with Android
Android will automatically display images when using @capacitor/push-notifications. If you test this in Firebase Console by setting Notification image the push notification will appear on the Android device similar to the screenshot below:
Images with iOS
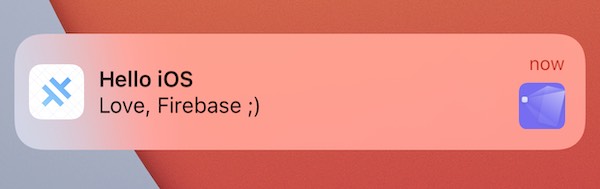
iOS requires a Notification Service Extension to be added to your project in order to display images in push notifications.
In XCode:
- Click
File>New>Target - Choose
Notification Service Extensionand clickNext - Enter a
Product Name(for examplepushextension) - Select your Team
- Click
Finish - When asked click
Activate
Choose pushextension from the list of Targets then:
- Click
Signing & Capabilities - Click
+ Capability - Choose
Push Notifications - Change the Deployment target from
iOS 16.4(or whatever Xcode chose) toiOS 13.0
If you do not change the deployment target for your extension then images will not appear on devices on an older version of iOS.
To add Firebase Messaging to the extension open your Podfile and add:
target 'pushextension' do
  pod 'Firebase/Messaging'
end
Then update Cocoapods by running:
npx cap update ios
Now open NotificationService.swift (it will be in the folder named pushextension) and replace the contents with the following:
import UserNotifications
import FirebaseMessaging

class NotificationService: UNNotificationServiceExtension {
    var contentHandler: ((UNNotificationContent) -> Void)?
    var bestAttemptContent: UNMutableNotificationContent?

    override func didReceive(_ request: UNNotificationRequest, withContentHandler contentHandler: @escaping (UNNotificationContent) -> Void) {
        guard let content = request.content.mutableCopy() as? UNMutableNotificationContent else { return }
        self.contentHandler = contentHandler
        self.bestAttemptContent = content

        FIRMessagingExtensionHelper().populateNotificationContent(content, withContentHandler: contentHandler)
    }

    override func serviceExtensionTimeWillExpire() {
        guard let contentHandler = contentHandler,
              let bestAttemptContent =  bestAttemptContent else { return }

        contentHandler(bestAttemptContent)
    }
}
You should now test a push notification from the Firebase Console remembering to set the Notification image and choose your iOS app. When it arrives on the iOS device it will appear on the right hand side as shown below: